3D Scanning, Design & Printing Services

Not sure where to start? Use the menu below to learn about our 3D scanning, design and printing services, check our FAQs, and discover how we can bring your ideas to life.
Jump to:
- CAD, 3D Design and File Preparation
- 3D Scanning
- 3D Printing
- Product Finishing
- Consultation & Advice
- Common Questions & Project Scenarios
Prefer to download a condensed copy of this page? Click here for our ‘Services & Options Guide’ PDF.
You may also download our ‘FDM Printing Design Guidelines’ as a separate PDF too.
CAD, 3D Design and File Preparation
We collaborate with you to understand your product design goals.
By utilizing CAD and 3D modelling software, we transform your ideas into final models ready for manufacturing or marketing applications.
Depending on your specific goals and product design ideas, we utilize two main categories of 3D design software to create or modify your models:
- CAD (Computer-Aided Design) software:
Designed for technical accuracy, CAD tools are ideal when your project requires precise measurements, tolerances, and mechanical functionality. This makes them the go-to choice for parts intended for manufacturing or engineering applications.
- General 3D modelling software:
These programs are more flexible and artistic, making them better suited for projects where aesthetic form matters more than exact dimensions — for example, sculptures, game assets, or conceptual mock-ups.
By selecting the right tool for the job, we ensure your design is created with both its purpose and production method in mind.
3D rendering transforms digital 3D models into still 2D images, using either photorealistic or stylised visual styles depending on your project’s needs.
These renders act like virtual photographs — showcasing your product in its intended environment without needing a physical prototype. As a result, they’re commonly used for early-stage evaluation, presentations, or digital marketing materials.
By using specialised software, we can apply different visual treatments to your model and scene. For example, we might simulate realistic lighting conditions, add material textures to the model, or use stylistic filters to match your brand or mood.
3D animation brings your models to life by creating dynamic video clips that showcase how a product works, moves, or assembles within a digital environment.
Unlike traditional 2D animation, this process uses 3D model files and computer-generated scenes to visualise movement, functionality, or key features with cinematic flair. It’s a powerful way to convey complex ideas clearly.
Depending on your goals, animations can demonstrate the product lifecycle, show step-by-step assembly or disassembly, or highlight critical features from multiple angles — making them ideal for marketing, instruction, or design validation.
Ready to start working on your project? Contact us now!
If you want to continue reading about the rest of our 3D scanning, design and printing services, click here to return to the list at top of this page.
3D Scanning
We use a portable 3D scanner to capture real-time scans of physical objects — such as your products — and convert them into accurate digital 3D model files.
These files can be used for a wide range of applications. You might want to:
Reproduce an object with 3D printing.
Use the scan as a blueprint to design new components that fit and function precisely.
Generate digital assets for video games or animations using the scan as a foundation.
We offer flexible post-processing options based on your needs. Whether you just need the raw 3D model file for your own use, or prefer a fully polished result as part of a wider project, we’ll tailor our service to suit your workflow.
Minimum Scan Volume: | 10 x 10 x 10mm |
Maximum Scan Volume: | 4000 x 40000 x 40000mm |
Working Distance: | 100 – 1000mm |
Scan Quality: | Up to 0.02mm precision and 0.05mm accuracy |
Colour Scanning Capabilities: | 48-megapixel RGB camera with 8K colour capture |
3D Light Source: | Class 1 Infrared Light |
Scanning Environment: | Indoors and Outdoors possible (avoiding direct sunlight) |
Object Tracking Methods: | Feature, Marker |
Special Object Scanning: | Scanning spray can be used to assist with scanning transparent, dark or highly reflective objects in varying degrees of success. Other objects may require painting prior to scanning to improve the quality. |
Output Formats: | .PLY, .OBJ or .STL |
Ready to start working on your project? Contact us now!
If you want to continue reading about the rest of our 3D scanning, design and printing services, click here to return to the list at top of this page.
3D Printing
Whether you already have a finished 3D model or need help getting one ready, we’re here to bring your ideas to life with precision 3D printing.
Once your file is good to go, we’ll produce your parts in the volumes you need — whether it’s a one-off prototype or a small production batch.
FDM Printing
FDM (Fused Deposition Modelling) is a 3D printing method that uses a continuous thermoplastic filament to build objects layer by layer. The filament is fed from a spool into a heated extruder, where it melts and is precisely deposited onto the build plate. As it cools, the material solidifies — gradually forming your part or product.
We typically print using grey PLA+ (Polylactic Acid), a popular and versatile material. However, we offer a range of alternative filaments in different colours and materials, and we’re always evaluating new options to expand our capabilities.
Not sure which filament suits your project best? We’ll help you select the most appropriate material based on your intended use, aesthetics, and required strength. Contact us to discuss your project.
FDM Materials & Colours
Click on a material below to explore its key characteristics, ideal use cases, and available colour options.
PLA+ is a Polylactic Acid-based filament enhanced with proprietary additives to improve performance across several key properties.
Properties | Positives | Negatives | Potential Applications | Colours Available |
---|---|---|---|---|
|
|
|
|
|
Impact PLA is a toughened variant of standard PLA (Polylactic Acid), offering greater flexibility, impact resistance, and durability — making it ideal for functional prototypes, mechanical parts, and protective components.
Properties | Positives | Negatives | Potential Applications | Colours Available |
---|---|---|---|---|
|
|
|
|
|
* PLA+ refers to enhanced PLA (Polylactic Acid) blends with better strength and durability than standard PLA.
PETG (Polyethylene Terephthalate Glycol) is a glycol-modified version of PET that combines strength, flexibility, and chemical resistance — making it ideal for prints requiring durability, water resistance, and moderate heat tolerance.
Properties | Positives | Negatives | Potential Applications | Colours Available |
---|---|---|---|---|
|
|
|
|
|
TPU (Thermoplastic Polyurethane) is a flexible, rubber-like plastic known for its durability, elasticity, and resistance to wear. It’s ideal for parts that need to bend, stretch, or absorb impact without breaking.
Properties | Positives | Negatives | Potential Applications | Colours Available |
---|---|---|---|---|
|
|
|
|
|
Our 3D printers can handle a wide range of materials beyond those listed above, including advanced engineering filaments such as:
ABS
ASA
Nylon (various blends)
Carbon fibre-reinforced filaments
And more, on request.
If you’re not sure which material or colour is right for your project, or you have something specific in mind that isn’t listed here, contact us now and we’ll help you find the best solution.
FDM Printing Design Guidelines
Download our ‘FDM Printing Design Guidelines’ PDF for easy reference, or explore the tabs below to learn more about the key design elements that require extra consideration when preparing a part for 3D printing.
Our 3D printers accept files in the following formats:
.STL
.OBJ
If your model is in a different format, don’t worry — we can convert it for you as part of the service.
Like all manufacturing methods, FDM 3D printing has a general tolerance range that applies to all part dimensions.
Our printers typically achieve:
Dimensional accuracy: ±0.5% (e.g. a 1.00 mm feature = 0.995–1.005 mm)
Minimum tolerance: ±0.15 mm
- Minimum: 2 × 2 × 0.4 mm
- Maximum: 245 × 245 × 240 mm
If your model exceeds these dimensions, feel free to send it over — we’ll review it and advise on possible solutions, such as splitting or resizing the part.

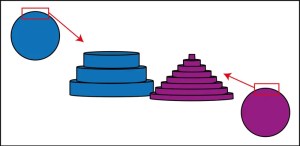
We offer the following resolution options:
- 0.28 mm: draft quality
- 0.20 mm: standard quality (default)
- 0.12 mm: high detail
Finer resolutions produce smoother surfaces and greater detail but also significantly increase print time.
Our 0.20 mm setting is the default, offering an ideal balance of speed, accuracy, and visual quality.
Let us know if your project requires a specific resolution.
To ensure both strength and printability, all vertical walls, embossed details, or raised text should have a minimum thickness of 1.2 mm.
Our printers can typically handle overhangs up to 45° from vertical without support.
Features exceeding this may require printed supports, which can affect surface finish.We’ll assess your model and add support structures where needed to ensure successful printing.
These rigid supports may leave visible witness marks on the printed surfaces they contact.
The level of post-processing required to remove or smooth these areas will be discussed during quoting.
Please refer to our Product Finishing service for guidance on available options.
For best visual clarity and reliable printing, embossed elements should have a minimum thickness and line width of 1.2 mm.
For clear and consistent results, engravings should be at least 0.6 mm deep with a minimum line width of 1.2 mm.
Unsupported bridges longer than 50 mm can sag during printing.
To maintain print quality, we recommend adding support structures beneath any bridges exceeding this length.
If not already included in your model, we will generate and add support material during print preparation where required.
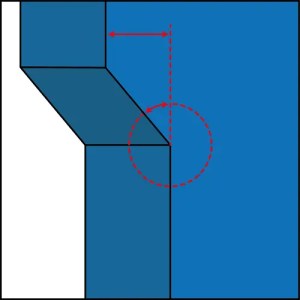
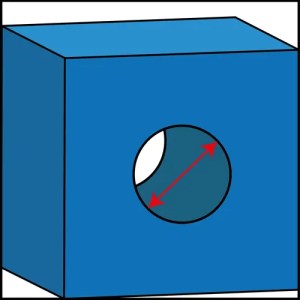
Small holes can close or deform slightly during the printing process.
- For reliable results, holes should have a minimum diameter of 1.2 mm.
- Holes under 3 mm may require post-processing (e.g. drilling) for precise fits.
- For self-tapping screws, design the hole diameter to be 90% of the screw’s thread diameter.
Pins should have a minimum diameter of 2 mm.
If the length exceeds 4 mm, consider increasing the diameter to improve strength and stability.
Any single feature (e.g. small protrusions, gaps, or isolated details) should be at least 2 mm in total size to print reliably and avoid breakage or deformation.
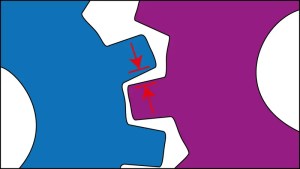
A minimum clearance of 0.2 mm is recommended to prevent fusing during printing. Smaller gaps may result in parts bonding together.
MSLA Printing
Coming Soon
MSLA (Masked Stereolithography), also known as resin printing, is a high-resolution 3D printing process that uses UV light to solidify liquid photopolymer resin, layer by layer.
The printer begins by submerging its build plate into a vat of liquid resin. A UV light source beneath the vat then projects an image of each layer, causing the resin to cure and solidify where exposed. After each layer is formed, the build plate lifts incrementally, allowing the next layer to adhere to the one before it.
This process results in extremely fine surface details and smooth finishes — ideal for miniatures, jewellery prototypes, dental models, and more.
We’re currently preparing to offer MSLA printing as part of our services. Stay tuned!
Ready to start working on your project? Contact us now!
If you want to continue reading about the rest of our 3D scanning, design and printing services, click here to return to the list at top of this page.
Product Finishing
Whether you’re printing a one-off prototype or a full batch of products for sale, we offer a range of surface finishing options to give your prints the right visual and tactile impact.
Prefer to handle finishing yourself or use a third party? No problem — we can ship your prints exactly as they come off the printer, with no post-processing applied.
No post-processing applied.
Prints are delivered exactly as they come off the printer — ideal for prototypes, internal parts, or where visual finish is not a priority.
Most 3D printed parts require some clean-up once printed — either due to support material, minor oozing, or visible seam lines from the layer-by-layer build process.
The Basic finishing level includes support removal, surface smoothing, and optional assembly of multipart designs.
Code | Process |
---|---|
B1 | Printed support material removed. |
B2 | Printed support marks smoothed. |
B3 | Print seam marks smoothed. |
B4 | External surfaces smoothed. |
B5 | Print washed in cleaning solution. |
B6 | Multi-part assembly and glueing. |
After the Basic finishing steps, additional surface treatment may be applied to reduce the visibility of layer lines and create a more refined finish.
The Standard level involves coating with filler, additional smoothing, and optional polishing or lacquer to prepare for display or further decorative finishes.
Code | Process |
---|---|
S1 | External surfaces coated in filler & smoothed. |
S2 | External surfaces polished. |
S3 | Print coated in clear lacquer. |
With the print fully smoothed and prepared, the Detailed level enables high-end finishes such as paint, rubberised coatings, or electroplating.
Custom coatings are also available upon request. Once coated, the part can be lacquered and assembled with any additional components required.
Code | Process |
---|---|
D1 | Surfaces primed for application of paint or speciality coating. |
D2-A | Surfaces coated in paint (satin/gloss/textured). |
D2-B | Surfaces rubberised with plastic-based coating. |
D2-C | Surfaces electro-plated for metallic finish. |
D2-D | Custom surface coating (on request). |
D3 | Application of clear lacquer over coatings. |
D4 | Further assembly or fitting of additional components. |
Material Compatibility Note – the finishing processes above apply fully to prints made in PLA+, Impact PLA, and PETG.
For example, a multi-part PLA+ print finished to level ‘D2-A’ (decorative paint) would require the following process steps:
B1 – B6
S1
D1 – D2-A
TPU prints are only suitable for Basic finishing, and ‘B6’ (assembly) may be less reliable due to the material’s flexibility. We recommend designing TPU prints to minimise the need for post-processing.
For all other materials, we’ll be happy to discuss your requirements to determine what’s achievable.
Ready to start working on your project? Contact us now!
If you want to continue reading about the rest of our 3D scanning, design and printing services, click here to return to the list at top of this page.
Consultation & Advice
If you’re working on a part or product design and need expert guidance to ensure everything is on track, we’re here to help.
Whether you’re designing for digital workflows, manufacturing, or 3D printing, our team brings the experience and insight needed to help you avoid common pitfalls and get your model production-ready.
From one-off advice to full design reviews, we support you in making sure your final result is functionally sound, fit for purpose, and ready to perform.
Ready to start working on your project? Contact us now!
If you want to continue reading about the rest of our 3D scanning, design and printing services, click here to return to the list at top of this page.
Common Questions & Project Scenarios
FAQs
Absolutely — you’re free to use as many or as few of our services as your project requires.
Some clients come to us with a physical object they need digitised through 3D scanning, while others already have a model and simply need printing.
Many projects benefit from the full 3D scanning, design, and printing workflow, but we’re happy to support just the parts you need. Our goal is to make the process as seamless and flexible as possible for you.
If your model does not meet all of the criteria listed above for the selected 3D printing technology, your parts could take longer to print or be more likely to fail during the printing process.
Before we print any of your parts, we inspect and analyse your files to identify any issues and pre-emptively detect potential failures.
It’s not a perfect system, and we’re not able to guarantee on-time delivery for parts that don’t meet the above criteria.
If the model falls short of these guidelines, we are unable to take responsibility for defects in the final print — so please follow them carefully.
Some of these guidelines are critical — for example, we cannot print single parts that exceed the maximum size listed.
Others, such as moving part clearances, may not apply to every design.
These criteria only affect features actually present in your model, so it’s essential to consider each one carefully during the design phase to ensure successful results.
We inspect all parts for major defects that might affect our printing process. However, not every guideline can be automatically checked.
If we detect potential issues, we’ll get in touch before printing — but we can’t guarantee we’ll catch everything.
If your parts fail to meet the design guidelines, we will not be able to take responsibility for any defects.
Thin areas of your model that fall below our minimum thickness are much more likely to print incorrectly.
Walls that are too thin may disappear or cause missing sections in the final print due to printer limitations.
Yes — you can use our CAD/3D modelling services to alter and optimise your design for 3D printing.
We’ll help you prepare your model so it meets the technical requirements.
Get in touch through the Contact Us page and let us know what you need. Don’t forget to attach your files!
Common Use Cases
Small and medium enterprises (SMEs) often face challenges sourcing discontinued or obsolete parts.
With our high-accuracy 3D scanning services, we help manufacturers, repair engineers, and fabricators reverse engineer mechanical components, housings, jigs, and fixtures.
Ideal for industrial part replication, we provide digital twins and printable replacements to reduce downtime and extend the life of valuable equipment.
Launching a new product or hardware start-up? Our on-demand 3D printing and scanning services support rapid prototyping, early-stage MVP development, and design validation.
With fast turnaround and no minimum order quantities, entrepreneurs can test and iterate affordably.
We support everything from ergonomic testing to fit/form trials for functional parts or product mock-ups.
Whether you’re restoring a vintage item, making a cosplay masterpiece, or fixing a broken appliance, we make custom 3D scanning and printing accessible for makers and DIYers.
We specialise in bespoke parts, fan replicas, and home fix solutions that aren’t available off the shelf.
No CAD knowledge? No problem — we can digitise and recreate real-world objects from physical samples or sketches.
Explore Past Projects & Custom Solutions
Curious about what 3D scanning and printing can achieve?
Take a look at our Projects page to explore real-world examples of how we’ve helped clients solve problems, prototype products, and create custom parts. From industrial components to creative commissions, see what’s possible when ideas meet precision.
Ready to start working on your project? Contact us now!
If you want to continue reading about the rest of our 3D scanning, design and printing services, click here to return to the list at top of this page.